Squeaky floors. Do they drive you crazy, like fingernails on a chalkboard (when those still existed)? Maybe you block out the noises now, having tolerated them for years. Maybe you avoid walking over those especially creaky areas in your house, winding your way from the living room to the refrigerator during quick episode breaks when binging on the latest, greatest Netflix Original.
Every house picks up some squeaks at some point. You might hear the chirps as music to your ears, sounds you chalk up as “the house is settling,” or as a sign of the years your family has been building memories in your home.
You also might have assumed those nuisance noises are part of life and you have no choice but to live with them.
The good news is you’re wrong about having no choice. You can, in fact, solve the squeak.
What Causes a Floor to Squeak?
Almost always, maybe 95 percent of the time, the reason your floor is chirping at you is because movement of the plywood subfloor is rubbing up and down on nail shanks. This happens when you step on it (floor presses down, rubbing on the nail), closing the gap between the subfloor and the joists its affixed to, and again when you move off the spot. This happens regardless the type of floor covering you have: wood flooring, carpet, whatever.
When you have hardwood flooring that is nailed rather than glued down, the other possible culprit for the noises is space between the plywood subfloor and the floor boards nailed to it. In that case, it’s the floor boards that are moving up and down against the nail or cleat shanks. But, again, the squeaks usually come from the subfloor.
To be clear, this is not a judgment against plywood subfloors. Plywood is the most common subfloor material. Exceptions are in basements or other circumstances where the subfloor is concrete. With concrete subfloors, wood flooring cannot be mechanically fastened (nailed or stapled down) during installation. It must be glued or floated.
Here are three reasons gaps occur that lead to plywood subfloors and nails squawking:
Moisture Content. If the subfloor material is not adequately dry before installation of the flooring on top of it, there will be problems. (Read “Humidity Matters” and “ Acclimation of Wood Flooring.”)
Wood is a hygroscopic material, meaning it absorbs and gives off water and water vapor, balancing with its surrounding environment. One of the most crucial steps in a wood flooring installation project is to measure the moisture content of the subfloor (plywood or concrete) and the flooring to be installed.
When plywood has a high moisture content, it warps. Picture the curve of rocking chair rockers. Imagine putting that 4’ x 8’ sheet of plywood on a curved back and trying to nail down its edges to force it into position. Or flip it over. Now the edges make contact with the joists, awkwardly, but it’s as if there is a bubble rising in the broad middle of the wood sheet.
It’s easy to see how that would lead to gaps and, ultimately, movement against the nails and make noise. When given time to dry, moderately wet plywood usually will relax, lie reasonably flat again, and be ready for use. But, there is an exception to this: water damaged plywood from a significant leak or flood in the house.
“If a wood floor is properly installed, it should not squeak or creak. However, if that same floor experiences water damage at some point in its life and is not properly repaired, then there is a good chance squeaks will occur,” said Jason Elquest, of Blackhawk Floors, in Phoenix, in Hardwood Floors Magazine. “We see this in floors that have been refinished after a flood or water leak. Even if the floor is allowed to dry properly back to its equilibrium moisture content, there is a very high likelihood that squeaks will occur. Because of this, it is sometimes necessary to replace, or at least address, the damage under the floor that we cannot see.”
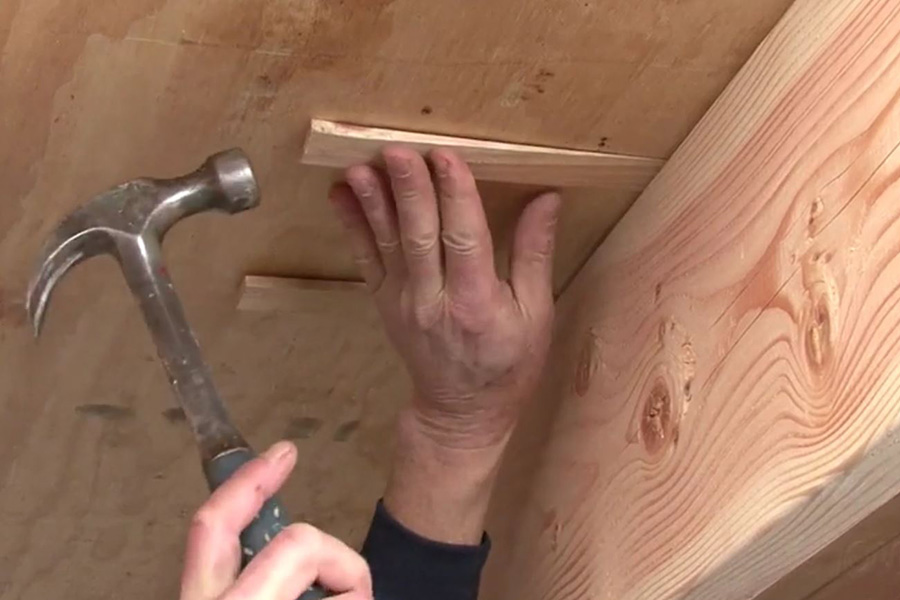
Using a wood shim to fix squeaky floors from beneath the floor
Proper Fastening. If the plywood subfloor is not adequately fastened to the joists, it will lead to movement of the subfloor. If you have a crawl space or an unfinished basement, go take a look at where nails from the subfloor come through.
You should not be able to see nails exiting the subfloor. They are supposed to be fastening securely into the joists. How many nails missed their target? You might see some that cleanly stick down through the subfloor, poking into nothing but air. Worse yet, given we’re talking about noises caused by wood and nails rubbing against each other, how many barely missed going into the joist and, instead, are rubbing alongside it?
Another issue can arise with an alternate type of subfloor material, known as OSB (Oriented Strand Board, a.k.a. “flakeboard”). Contractors debate OSB vs. plywood. Each has their best uses, and thickness of the material is key. An issue that can occur with OSB is “blowout.”
When installing OSB by using a pneumatic nail gun, blowout occurs if the air pressure applied with the nail gun is excessive or if the OSB material being used is not sufficient. Blowout is the breaking apart of the OSB in the bottom (or back) of the material. In the case of a subfloor, that leaves the nail being held more loosely than you want by the subfloor. That will lead to movement, and squeaks.
Nailing a plywood subfloor with a pneumatic nail gun is the efficient approach to the subfloor installation job. But using screws (of the proper type and length) with precision to fasten solidly into the joists is the quality approach that will prevent floor squeaks.
Here’s the advice of Mike Holmes, famed TV host, and home inspection and repair pro. “I always glue and screw my subfloors. The glue secures that connection and the screw locks it in place. Remember, nails can pull up; screws don’t. This gives us stronger floors that will not move or squeak.”
Cheap Quality Subfloor. You’ve heard it and, probably, you’ve said it in your line of work: You get what you pay for. When builders use commodity-grade materials to make the project more acceptable to the buyer, there is a price that will need to be paid down the road.
“It is vitally important for the installer to have a clear understanding of different quality subfloor panels and make the correct recommendations to their builder to avoid a noisy subfloor or wood floor,” said Roy Reichow, of National Wood Floor Consultants, in Cedar, Minn., in Hardwood Floors Magazine.

How to Fix Squeaky Floors
The truth. There is a range of options and convenience when it comes to fixing floor squeaks, but the convenience-factor varies.
The best time to fix squeaks is during a new floor installation project. That’s when the old floor is taken out and the subfloor is exposed from the top. That’s when damaged sections of subfloor can be replaced. It also is when screws and screws and screws can be fastened throughout the subfloor.
Next best is having an exposed underside of the floor, through a crawl space or in an unfinished basement.
Lastly, it’s possible to fix the squeaks from the top without tearing out the floor. But it’s not as fool-proof.
Fixing Squeaks from Exposed Areas Beneath the Floor
Wood Shims. Use a thin wood shim, coated with carpenter’s glue. Tap the shim into the gap between the joist and subfloor. Don’t drive it in so far you push the flooring up; just create solid support in the open space. For added support, drive a 1 ¼” screw at an angle up through the joist and shim, and into the subfloor.
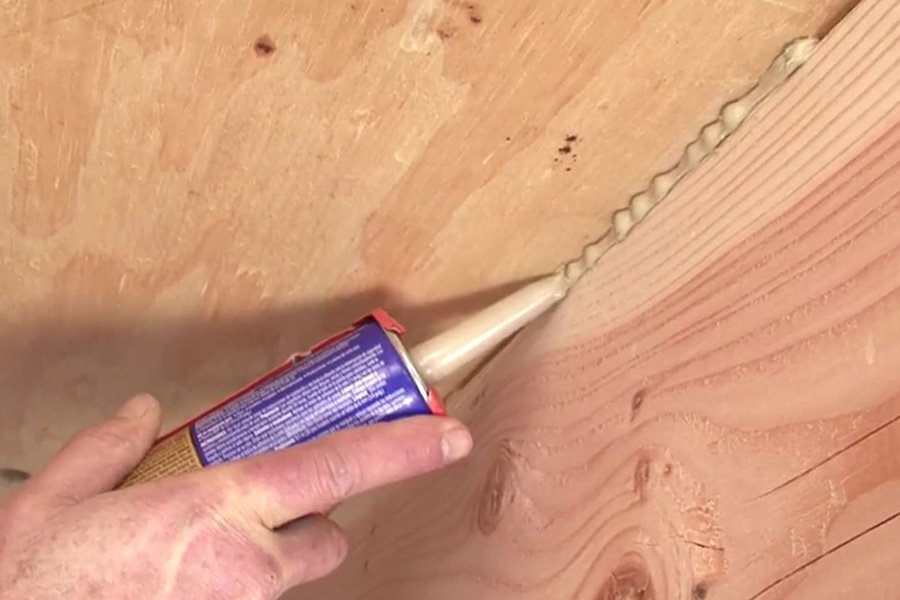
Construction Adhesive. If the gap runs a lengthy distance along the joist, you might prefer to use construction adhesive, rather than insert a series of shims. Use a caulk gun to apply the adhesive to fill the gap.
Fasten from the Bottom. If shims or adhesive don’t quiet the squeaks, the noise probably is due to space between the wood floor and the subfloor, and the floor boards are rubbing on nails or cleats. To solve this, you can fasten the wood floor to the subfloor from the bottom by using screws to pull down and hold the floor boards to the plywood subfloor.
Drill pilot holes for the screws. Use screws that are long enough to pass through the subfloor and deeply enough into the wood floors above, while being careful not to use screws that are long enough to even get close to the top surface of the floor boards.
Obviously, you don’t want a screw tip to poke through the floor to where it can be stepped on. But, less obviously, you can create a sort of blowout – split wood and damaged finish – at the surface, if you go too far.
Most solid wood flooring is ¾” thick. Engineered can be that thick, but often is not. Add to the thickness of the plywood, and gauge the screw length you need to safely do the job. If you’re unsure how thick your wood flooring and subfloor are, the place to measure is at a floor vent.
Pull the cover off, and you should be able to see the thickness of the wood flooring. The sheet metal might block your view of the subfloor. Try another vent and, if needed, another until you find an easy view. Or, use pliers to make just enough space to slide your measuring tape or ruler past the sheet metal and get the reading you need.
Hold-Down Bracket. A hold-down bracket is a threaded rod attached to a flat mounting plate on one end, and a steel bracket fitted with a squared-off hook on the other end. Screw the mounting plate to the underside of the subfloor with four screws. Position it directly under the squeaky area. Slide the bracket over the threaded rod and hook it onto the joist. Spin a nut onto the rod, then tighten it with a wrench until the subfloor is pulled down snug against the joist.
Fixing Squeaks from Above the Floor
More truth. The options for fixing the squeaks from above are limited, and risk slightly altering the surface. There are two common solutions for fixing squeaks from above the floor.
One is to screw through the wood floor (or other type of floor covering) into the subfloor and joist. This will leave a hole at the surface, so you will want to minimize the diameter of that hole. For wood flooring, you will need to fill the hole with wood filler and, possibly, use a floor stain marker to mask the repair.
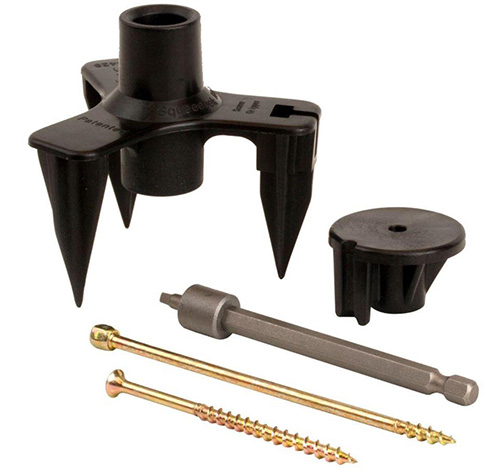
An example of a squeak-elimination kit that uses a breakaway screw head.
Big box stores sell such squeak elimination products. They come with the parts needed, including a breakaway screw head that will leave the shaft of the screw sunk in the floor and holding the floor board to the subfloor, and the subfloor to the joist.
Another above-floor option is to use an epoxy injection kit. It requires a small hole be drilled through the floor boards where squeaks occur, so also will require minor hole repair. The epoxy that gets injected into the gap below the board should fill the space and bond the floor board to the plywood subfloor, eliminating the squeak.
Epoxy kits also are readily available for homeowner purchase. Palo Duro sells 3M’s Hardwood Flooring Epoxy Repair Kit.
The Bottom Line: Fixing Squeaky Floors
Squeaky floors don’t have to be an aggravating soundtrack to your life. And the repairs don’t have to be costly or done by a professional.
Look at your options. Make your move. And reap the rewards of silence.
Learn more. Signup for the monthly Palo Duro Hardwoods email newsletter, and join us on Instagram, Facebook, Twitter and Houzz.

